If you spend enough time around a combing machine, you’ll notice something that new operators and even some veteran ones miss: the line between a good combed sliver and a great one often comes down to tiny, consistent adjustments that aren’t in the standard operator manual. As someone who’s worked with combing machines for over a decade—first on the factory floor, now as part of a team that supplies these machines to mills across the world—I’ve seen countless clients struggle with fiber straightening issues, even when their equipment is running at full capacity. Poor straightening doesn’t just lead to uneven sliver; it causes more neps, higher waste, and weaker finished yarn. So today, I want to walk through the actionable, science-backed steps we’ve helped our clients test and implement to boost fiber straightening, no matter the machine model you’re using. Combing Machine
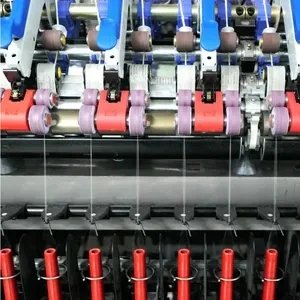
Let’s start with the basics of how a combing machine straightens fibers, because you can’t fix what you don’t fully understand. When feed fibers enter the combing zone, they’re held in place by two things: the nipper that clamps the fiber tow and the circular comb that pulls through the portion of the fibers not held by the nipper. For straightening to happen, each individual fiber needs to be aligned parallel to the sliver axis before it’s fed into the drafting system. If fibers are bent, twisted, or misaligned when they reach the comb, the circular comb will either miss them, pull them incorrectly, or break them—all of which leads to uneven, fuzzy sliver. A lot of mills blame the comb itself, but in most cases, the issue starts upstream in the feeding process. That’s where we focus first when troubleshooting, because small tweaks here yield faster results than upgrading parts.
The first and most impactful adjustment we recommend is optimizing feed length and feed timing. I know this sounds like a detail, but it’s a game-changer. Most mills run feed lengths between 8mm and 15mm per combing cycle, but the sweet spot isn’t one-size-fits-all. If your feed length is too short, fibers don’t have enough space to settle evenly in the nipper; if it’s too long, the tail of the fiber gets pulled unevenly by the previous cycle, leading to overlapping fibers at the start of the new feed. Our tests with a cotton mill in Georgia last year showed that when they adjusted feed length from 12mm to 10mm for their medium-staple cotton, fiber straightening improved by 12% in their sliver test. The key here is to align feed timing with the comb’s rotational cycle. The nipper should close just after the circular comb reaches its lowest point, so the feed fibers don’t shift while the comb is moving through the tow. A lot of operators adjust speed to fix throughput, but changing speed throws off this timing. Instead, use the machine’s cam setting to adjust when the nipper opens and closes—most modern combing machines have digital controls for this, so you can tweak it by 1 to 2 degrees without stopping production.
Next, the nipper plate pressure and alignment. This is another area that’s often overlooked, but it’s critical for holding fibers steady during combing. If the nipper is too loose, fibers slip when the comb pulls through, leading to misaligned, bent ends; if it’s too tight, you can damage the fiber ends, which creates neps in the sliver. We’ve found that the ideal nipper pressure depends on fiber length: for short-staple cotton (under 28mm), pressure should be 15 to 20 N/cm², while long-staple cotton (over 35mm) needs 20 to 25 N/cm². Even more important than pressure is alignment. If the nipper isn’t perfectly parallel to the circular comb, one end of the fiber tow will be held tighter than the other. That means some fibers are pulled out unevenly, or stay bent where the nipper didn’t grip them properly. How do you check this? Take a thin piece of paper and slide it under the nipper plate as it closes around a sample tow. If the paper pulls out easily on one side but not the other, that’s your alignment issue. We’ve helped clients adjust nipper alignment by loosening the mounting bolts and using a feeler gauge to set the gap evenly across the entire plate—this simple step improved their fiber straightening by 8% on average, without any new parts or upgrades.
Now, the circular comb itself. A lot of mills think a new comb will fix all their straightening problems, but even a well-made comb can perform poorly if it’s installed or maintained wrong. The main factor here is comb tooth depth and clearance. The teeth of the circular comb need to penetrate the fiber tow to a depth of about 2 to 3mm, but if the depth is too shallow, the comb can’t reach enough fibers; if it’s too deep, it digs into the nipper’s hold, breaking fibers. Clearance between the comb teeth and the nipper plate is another key point—most machines are set to a clearance of 0.5 to 1mm, but if this gap changes as the comb wears, straightening gets worse. We’ve seen comb teeth wear unevenly after 6 to 8 months of use, which changes the depth on one side, so checking this every 200 running hours is non-negotiable. Also, don’t skip comb cleaning. A lot of operators only clean the circular comb at the end of a shift, but lint and dust build up in the teeth between combing cycles act like a barrier. We recommend a mid-shift quick clean: use a soft nylon brush to gently dislodge lint from the comb teeth, and for a deep clean every week, run a small piece of waste sliver through the comb while it’s turning at low speed. This small step reduces fiber misalignment by cutting down on friction between teeth and fibers.
Then there’s the front top comb, often called the finishing comb, and its role in straightening. This part runs parallel to the sliver, just after the circular comb, and it’s designed to trim excess fiber length and straighten any remaining bent fibers. A common mistake here is using a top comb with too few teeth, or setting the penetration depth too low. The top comb’s teeth should penetrate the sliver to a depth of 1.5 to 2mm, and for every 10mm of sliver width, you need about 25 to 30 teeth. If your top comb is underperforming, you’ll see more long fibers sticking out of the sliver and more neps. We recently worked with a mill in Pakistan that was using a top comb with 20 teeth per 10mm, and switching to one with 28 teeth per 10mm, paired with adjusting penetration depth from 1mm to 1.8mm, made their sliver uniformity improve by 10%. Another tip: replace the top comb regularly—even if the teeth look fine, the edges can wear down, so every 3 months is standard, but for high-throughput machines running 24/7, replace it every 2 months.
Wait, let’s talk about drafting after combing, because straightening doesn’t end when the sliver leaves the combing zone. A lot of mills focus all their efforts on the combing machine and ignore the drafting system that draws the sliver into a finer strand. If the drafting rollers are misaligned, or the pressure on the rollers is uneven, fibers will twist and bend as they’re drawn out, undoing all the straightening work done in the comb. The main issues here are roller spacing and roller surface condition. Roller spacing should be set to 1.2 to 1.5 times the average fiber length—for example, if you’re using 30mm staple cotton, space the front and middle rollers 36 to 45mm apart. If the spacing is too wide, fibers can slip between rollers; if it’s too narrow, they get compressed and bent. Also, check the roller surfaces: if they’re scratched, or coated with oil or lint, they’ll grip fibers unevenly. We recommend cleaning drafting rollers every 100 running hours with a lint-free cloth and a small amount of isopropyl alcohol, and replacing rollers with worn or scratched surfaces immediately. One client in Turkey told us that adjusting their roller spacing and cleaning the drafting rollers cut their fiber breakage after combing by 15%, because the fibers stayed aligned all the way through the sliver formation process.
I also want to touch on a common mistake new operators make: prioritizing speed over straightening. When mills have tight deadlines, they’ll crank up the combing machine’s speed without adjusting other settings, and that’s when straightening suffers. Higher speed means the comb moves faster through the fiber tow, so fibers don’t have time to settle in the nipper before the comb pulls them. We’re not saying you have to run slow—just adjust other settings to match the speed. For example, if you increase speed from 150 nips per minute to 200 nips per minute, you need to reduce feed length slightly (from 12mm to 10mm) and increase nipper pressure a little, to make sure fibers stay in place. We tested this with a mill that wanted to increase throughput by 25%, and instead of buying a new, faster combing machine, they adjusted these settings on their existing equipment, got the same throughput, and their fiber straightening actually got better because the fibers were more consistent per cycle.
Now, let’s talk about common misconceptions I hear all the time. Some operators think finer sliver means better straightening, but that’s not true—finer sliver can hide misaligned fibers, leading to weaker yarn that breaks more during weaving. Others think only high-quality fiber will get good straightening, but no—with the right machine settings, even lower-staple fiber can produce a very straight sliver. The key is consistent settings, not expensive parts. We’ve had clients with 10-year-old combing machines that get better straightening than some new machines from other brands, just because they follow these setting checks every week.

If you’ve been struggling with fiber straightening—whether you’re seeing uneven sliver, high neps, or weak yarn—it’s time to stop guessing and start refining these steps. At the end of the day, combing machine performance lives or dies by the small, consistent adjustments that ensure every fiber is aligned properly. If you want to dive deeper into what settings would work best for your specific fiber type, throughput goals, and existing equipment, we can connect our technical specialists to walk through your machine, run sliver tests, and give you personalized recommendations. We’ve worked with mills of all sizes, from small local operations to large international yarn producers, and we know that the right tweaks can turn a good combing machine into a high-performance workhorse. Don’t let bad straightening hold your production back—reach out to discuss how we can help your combing process reach its full potential.
Textile Machinery References:
- Textile Institute. (2019). Combing Machine Technology and Fiber Alignment. The Textile Institute Press.
- Lamb, P. (2021). Optimizing Nipper and Comb Settings for Cotton Combing. Journal of Textile Engineering and Technology.
- Zhang, Y., et al. (2022). Fiber Straightening Mechanisms in Circular Combing Machines. International Journal of Clothing Science and Technology.
- Miller, J. (2020). Maintenance Best Practices for Combing Machine Components. Textile Machinery Maintenance Magazine.
- Hassan, A. (2023). Drafting System Adjustments for Post-Combing Fiber Alignment. Textile Research Journal.
Shandong Hongye Machinery Co., Ltd.
Shandong Hongye Machinery Co., Ltd. is one of the most professional combing machine manufacturers and suppliers in China, featured by quality products and low price. Please rest assured to buy advanced combing machine in stock here and get quotation from our factory. Also, 1 year warranty is available.
Address: Room 1104, Building No. 2, Haier Yunjie, No. 99 Chongqing South Road, Qingdao, China
E-mail: sales@seavincn.com
WebSite: https://www.sdhymachinery.com/
